This article is intended to provide an illustrated guide to making Carbon wings. In 2003 I had made two usable F1A glider wings so, although my technique was in its first stages then, it has changed very little since. This article incorporates all lessons learnt and changes made to the procedures since those first wings were made.
This guide mainly illustrates F1A glider wing construction, along with notes about making carbon F1J wings and tail surfaces. However, it should be adaptable to other classes, which all require considerably less strong, and hence lighter, wings.
Comments are included as appropriate to indicate where other classes require different techniques to F1A.
Pay attention to the accuracy of your work - in particular to sanding spar webs. Unlike other wing construction techniques, you cannot fix an inaccurate wing by sanding it after assembly because the carbon used in the D-box and cap strips is extremely thin and any attempt to correct the section will probably destroy the wing by sanding through the carbon. The wing has to be right when it is assembled and this means that the spar in particular has to be made very accurately if it is to fit inside the D-box without distorting the section. You should aim for dimensional accuracy of +0.1 mm - errors of +0.25 mm or more will be very obvious.
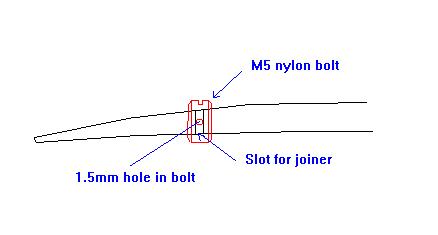
Similarly, you've never built a wing this torsionally stiff before. The covering has almost no effect on the stiffness or warps. However, a consequence is that you must assemble the wing very accurately because the warps you build in are the warps you get. It's almost impossible to change the warps after the wing was been assembled. Because of this you should consider installing an incidence adjuster. If your wing attachment is standard (single main joiner in the spars and secondary joiner pins in the wing near the TE, each made from 1.5 mm wire and projecting about 6 mm from the wing to fit into tubes in the fuselage) this is easy to make. I use 6 mm ply wing roots on my pylon. I drilled and tapped the right root to take an M5 nylon bolt (M5 is about 7/32" diameter; standard r/c wing attachment bolt), hardened the thread with cyano and cut through the rib from the outside to the thread to leave a slot for the joiner pin to move up and down in. Then I cut a suitable length of bolt, drilled a hole through it to fit the rear joiner pin and slotted the top to take a screwdriver. Screwed it into the fuselage wing root. Job done. A half turn moves the TE somewhere between 0.25 and 0.5 mm. The friction in the thread is sufficient to stop the bolt moving during transport and it is, of course, locked by the rear pin in flight:
If you buy your carbon parts (spar flanges, D-boxes etc) you will need relatively few extra tools and techniques. Its making the carbon parts that requires the additional tools.
From a glider perspective, we usually don't and/or can't buy complete spars, but carbon wing kits are common. These consist of the spar flanges, TE, spar caps, D-box shells, joiner and the blocks it fits into. This article assumes that you will buy all carbon sheet parts (spar flanges, etc) and joiner blocks and will make the rest including the D-box shells.
My chief sources of equipment and materials are listed in Appendix C.
I am currently using a 0.02 mm thick transparent heat shrinking film that is used to wrap cigarette packs. It comes in rolls that are 360 mm wide. Nothing sticks to it. Not epoxy. Not cyano. Its thick enough and anti-static enough to be easy to handle on the workbench. In the UK this is known as 'Hook film'. John Hook gets the dog-ends left whenever the roll is changed in the wrapping machine. These are essentially scrap despite having anything up to 600 m of film on the roll and so can be had almost for the asking. Look around - you should be able to find a cheap source at your local shrink-wrap packaging plant.
Last but not least, you do NOT want to have release film left on the inside of the D-box where it will prevent the ribs sticking. The Hook film just pulls out without sticking or tearing - excellent. If you use Mylar you'll have to scrape and file it off the gluing areas with the consequent risk of damaging the D-box.
I assume you have sufficiently good rulers etc. to build accurately and will not mention these again. However there are three extra things you will be measuring a lot when you start to work with carbon: weight, thickness and volume.