MTK 446 electronic timer: connections
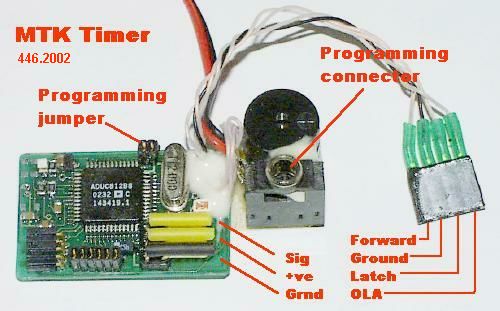
MTK 446 model 2002
-
Servo connectors: two sets of pins are stacked on top
of each other on the lower right corner of the main circuit
board. The lower connector is servo 1 and the upper
connector, which has insulating plastic tubes fitted, is
servo 2. The pin nearest the programming jack is pin 1 in the
following table. It is wired as shown using a three pin
unpolarised servo connector:
| Pin |
Use |
Wire colour |
| 1 |
Signal |
White |
| 2 |
+ve supply |
Red |
| 3 |
Ground |
Black |
-
Tow hook: this connector is a flat, four pin
unpolarised socket on a flying lead. All wires linking this
socket to the timer are white apart from the Ground
connection (pin 2), which is black. Pins are used as shown:
| Pin |
Use |
Switch closed (ON) |
| 1 |
Hook position switch |
hook forward |
| 2 |
Ground connection |
- |
| 3 |
Latch position sensor |
latch closed |
| 4 |
OLA sensor (inertia hook only) |
hook extended |
- Battery connection: a standard Futaba red battery
connector. The timer has the male side attached to it. This has
two pins inside a polarised plastic shroud. It is not shown in
this picture.
- Programming connector: the 3.5 mm stereo jack socket
below the beeper. These together form the black block to the
right of the main circuit board.
- Programming jumper: this is not connected during
normal use. A special jumper, with its pins joined by a 1K ohm
resistor, is inserted when the timer firmware is being
upgraded.
MTK 446 model 2004
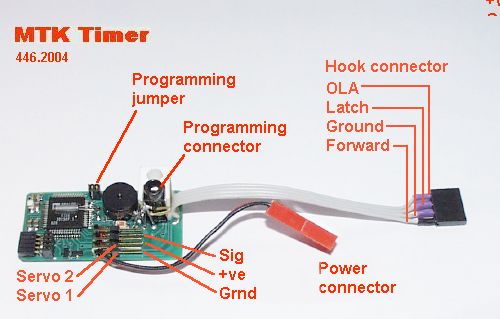
The serial number (e-block number) of these timers is written
on the side of the white plastic mounting block.
-
Servo connectors: two sets of pins are stacked on top
of each other on the lower right corner of the main circuit
board. The lower connector is servo 1 and the upper connector
is servo 2. The pin nearest the programming jack is pin 1 in
the following table. It is wired as shown using a three pin
unpolarised servo connector:
| Pin |
Use |
Wire colour |
| 1 |
Signal |
White |
| 2 |
+ve supply |
Red |
| 3 |
Ground |
Black |
-
Tow hook: this connector is a flat, four pin
unpolarised socket on a four-way ribbon cable is used. The
Forward connection (pin 1) has differently coloured
heat-shrink insulation to the other pins. Pins are used as
shown:
| Pin |
Use |
Switch closed (ON) |
| 1 |
Hook position switch |
hook forward |
| 2 |
Ground connection |
- |
| 3 |
Latch position sensor |
latch closed |
| 4 |
OLA sensor (inertia hook only) |
hook extended |
- Battery connection: a standard Futaba red battery
connector. The timer has the male side attached to it. This has
two pins inside a polarised plastic shroud.
- Programming connector: the 3.5 mm stereo jack socket
below the white mounting block.
- Programming jumper: this is not connected during
normal use. A special jumper, with its pins joined by a 1K ohm
resistor, is inserted when the timer firmware is being
upgraded.
Tow hook and servo connections
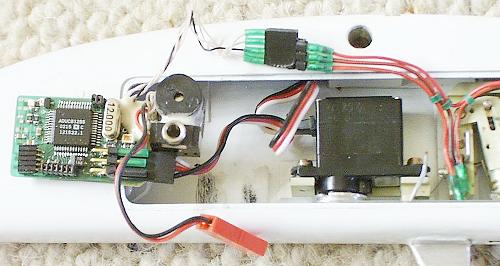
Here the timer is removed from the model but still connected
to tow hook and servo. The battery is not connected.
- Servo 1: the connector is plugged onto the set of
pins nearest the board's surface with the black wire nearest
the edge of the circuit board.
- Tow hook: the isolated white wire between timer and
hook connector, at the bottom of the connector in this picture,
connects to the 'hook forward' switch.
Connecting to a Palm PDA
The MTK timer can only be connected to a Palm PDA by
connecting the cable supplied with the timer to the HotSync cable
supplied with the Palm device. The MTK cable is terminated by the
3.5mm stereo jack that plugs into the timer at one end and a male
D-9 connector, installed in a grey plastic hood, at the other.
The plastic hood is sealed and contains circuitry powered from
the D-9 connector that converts signals to RS-232 levels and
handles hardware flow control via the Data Set Ready, Request To
Send and Clear To Send signals. The Hotsync cable doesn't contain
any active circuitry, but its pin-outs show that it is a
cross-over, or "null-modem", cable.
| MTK programming cable |
Palm m100 serial HotSync cable |
| Stereo jack |
Signal source |
D-9 male connector |
| tip contact |
MTK timer |
Pin 2 Receive data |
| mid-barrel |
MTK timer |
Pin 3 Transmit data |
| main barrel |
MTK timer |
Pin 5 Signal ground |
|
generated in cable |
Pin 6 Data set ready |
|
used by the cable |
Pin 7 Request to send |
|
generated in cable |
Pin 8 Clear to send |
|
| D9 female connector |
Palm m100 connector |
| Pin 2 Receive data |
Pin 5 TXD transmit data |
| Pin 3 Transmit data |
Pin 3 RXD receive data |
| Pin 5 Signal ground |
Pin 10 SG signal ground |
| Pin 6 Data set ready |
Pin 1 DTR data terminal ready |
| Pin 7 Request to send |
Pin 6 CTS clear to send |
| Pin 8 Clear to send |
Pin 4 RTS Request to send |
|
Connecting to a Casio PDA
To be written
Connecting to a PC
The timer must be connected to a PC to upgrade its firmware.
The firmware loader is configured to use COM2, so this serial
port must be available on the PC being used for the upgrade: many
laptops only have one serial port and so are unsuitable for this
task. The connection to the timer is made using the standard
programming cable supplied with the timer. However, both this
cable and the PC's COM2 port have male D-9 connectors, so an
additional adapter cable is needed between the timer's cable and
the PC.
The adapter cable has two D-9 female connectors with all pins
connected straight through, i.e. pin 1 to pin 1 etc. MTK can
supply the adapter cable if one cannot be found locally. An
alternative would be to use a female-to-female D-9 gender
changer.